Build a VM for Drupal 8 with Vagrant
At this year’s php[world] hackathon, I spent my time getting a Vagrant machine configured to run Drupal 8. I know there are other options, like Acquia’s own Dev Desktop, or even Zend Server. However, I like using Vagrant to run my LAMP stacks, especially on OS X. I’ve never been able to easily run xAMP on non-Linux machines. Installing MySQL can be a pain, system updates can change the version of PHP you’re running, and some PHP extensions are really difficult to build—even with Homebrew. Vagrant simplifies getting a working development environment running by automating the provision of a virtual machine for you, usually with a tool like Chef, Puppet, or Ansible. I used the hackathon as an opportunity to check out the shell script provisioner. If you know you’re way around the shell, this is a very straight-forward method since it uses the same commands you’d type in yourself at the terminal. There are a number of other benefits to using Vagrant:
- Match your development environment exactly to your production server, so there’s no more “works on my machine”.
- No need to install stuff you don’t need on your main operating system just for one client site.
- Each site you work on gets its own machine, that you can destroy when the project is done.
- Save your provisioning scripts in Version Control, to track how they change.
- Share your
Vagrantfileand scripts with colleagues, so everyone works in an identical environment. - Easily test code in new environments. How will your codebase run in PHP 5.6? Fire up a new machine and test it.
In this post, I’ll walk through setting up a Vagrantfile and shell script to install Apache, MySQL, PHP on a basic Debian machine; automatically download and extract Drupal 8, and create a database for the site. At the end, we’ll just have to walk through the installation steps in a browser.
Configuring the Virtual Machine
The Vagrantfile describes the machine for a project and how to configure and provision it. It controls things like how to setup networking, map files between the host and guest OS, and run the provisioner we chose. Let’s take a look at some key configuration settings. First, we have to specify the box to build on. These are box images, many provided by the community, that have the base OS and some tools. There are boxes for CentOS, Redhat, and more. The line below tells vagrant to use a Debian 7.4 box that has chef installed (even though we won’t be using chef).
config.vm.box = "chef/debian-7.4"Next, we configure networking so that our box is accessible from the host OS. Here, I’m using the private_network option, so the box and specifying an internal IP address. If you need your virtual machine to be accessible from other devices on your local network, look into using a public_network.
config.vm.network "private_network", ip: "192.168.33.10"For this config, I’m just using the default shared folders setting. This maps your project directory to /vagrant/ on the guest OS. If you haven’t used Vagrant before, shared folders map one or more directories from your host machine to paths on the virtual machine. In effect, this lets you work and edit files in your favorite IDE on your machine while the guest OS sees and uses the same files. So, for example, you change sites/default/default.settings.php in PHPStorm in your home OS, and Drupal in the VM will process the changes. If you need to map more directories, see the comments in the default Vagrantfile. For example, to map the web directory to /var/www/drupal8, you’d do something like the following:
config.vm.synced_folder "web", "/var/www/drupal8"Finally, we have to tell vagrant what do once the machine is booted up in order to configure it. This is done with a provisioner, and there are many to choose from. As I mentioned earlier, I’m using a simple shell script for this machine; specified with the config.vm.provision setting.
config.vm.provision "shell", path: "provision/setup.sh"Setting Up Additional Components
When you start your box for the first time with vagrant up, the provisioner will take care of installing additional components and configuring them. My first pass at this was a bit naive, though it worked. I later came back and augmented it to check if something was already available (you can run vagrant up --provision to re-provision an existing machine). For example, the following part of the script will setup Apache. First, we test if the Apache configuration is present. If it is, we assume it’s already configured and continue. If it’s not present:
- It’s installed from the apt repositories,
- The Rewrite module is enabled,
- We copy some custom environment settings and change directory ownership so that Apache runs as the
vagrantuser. This is necessary to allow the web server to copy uploaded files into a folder atsites/default/files.
if [ ! -e "/etc/apache2" ]
then
    echo "Installing Apache"
    apt-get install -y apache2
    a2enmod rewrite
    cp /vagrant/provision/apache2-envvars /etc/apache2/envvars
    sudo chown vagrant /var/lock/apache2
    usermod -a -G adm vagrant
fi
Similarly, later in the script we use wget to download and extract the Drupal 8 source into a web directory. $DRUPAL_SRC is a variable configured at the beginning of the script, for when it changes.
# download drupal
if [ ! -e "/vagrant/web/" ]
then
    echo "Downloading Drupal 8"
    mkdir /vagrant/web/
    cd /vagrant/web/
    wget --quiet $DRUPAL_SRC
    tar --strip-components=1 -xzf `basename $DRUPAL_SRC`
    rm `basename $DRUPAL_SRC`
    rm /vagrant/web/sites/default/default.settings.php
fi
Take a look at the complete script to familiarize yourself with what it does.
Provisioning with Ansible
At the same hackathon, Sandy Smith worked on setting up a similar machine with Ansible. We had a friendly competition going over who’s method would work first, and we both hit a few snags. Learn more about provisioning with Ansible in the September 2014 issue In the end, there wasn’t much of a difference. However, the Ansible provisioner reuses existing “roles” coupled with variables you specify. This leads to much smaller “playbooks” to configure a new machine. It also takes care of tracking what changes have been made if you re-provision a box.
---
- hosts: all
  sudo: true
  vars:
    web_server: apachephp
    servername: drupal8.local www.drupal8.local 192.168.33.99
    timezone: America/New_York
  vars_files:
    - vars/mysql.yml
    - vars/common.yml
    - [ "vars/apachephp.yml", "vars/ws_defaults.yml" ]
  roles:
    - init
    - php5-cli
    - apache
    - php5
    - mysql
    - composer
    - phpcommon
    - app
Using the Box
Before using the box, you have to install Vagrant and Virtualbox on your machine. Then clone or download the files from from github: https://github.com/omerida/drupal8-vm. In the directory where the files are use vagrant up to start the machine. The default URL is http://drupal8.dev/ To access it, add the following line to your hosts file:
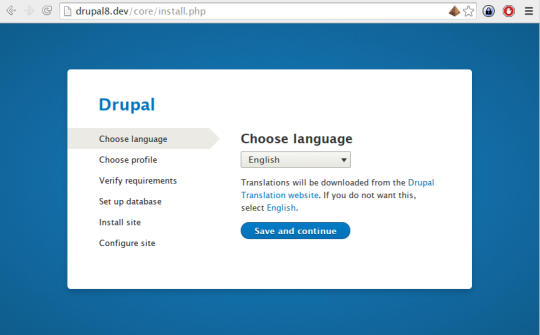
192.168.33.10 drupal8.devOnce the box is booted, open a browser and go to “http://drupal8.dev” and you should see the Drupal 8 installation wizard. 
What’s next?
This gives you a very basic machine to work on. From here, you could do a number of things:
- Add the dotdeb.org repository to get newer versions of PHP and MySQL.
- Figure out how to add drush to the guest system
- Further automate the basic Drupal installation
- See how to install contrib modules to the site.
If you can script it, you can automate it.
Leave a comment
Use the form below to leave a comment:


Responses and Pingbacks
July 7th, 2015 at 4:30 am
For drush, composer is the best. You can use a variable on ansible, and change the version of drush very easily from a yaml file.
There is a popular VM for Drupal 8 (supports drupal 7 too) that uses ansible. I tested it with Ubuntu only, but the creator is using CentOS with it. It supports only Apache at the moment. If you want to have a look : https://github.com/geerlingguy/drupal-vm