Building Your First WordPress Plugin
By David Wolfpaw
For many, working on a WordPress theme or plugin is there first foray into PHP development. When doing so, there are many ways to do things, but in the long run, you’re better off following WordPress’s conventions and idioms. In this article, we’ll go through how to structure and write a plugin from scratch, insert our code with the proper hooks, and leverage the subsystems WordPress provides for storing configuration settings, declaring plugin metadata, and outputting HTML.
Get the Full Issue
This article was published in the October 2019 issue of php[architect] magazine. Download the Free Article PDF to see how it looks in the published magazine.
If you'd like more articles like this one, become a subscriber today!. You can get each monthly issue in digital and print options or buy individual issues.
Getting Set Up
The WordPress Developer Handbook
We’re going to reference the WordPress Developer Handbook frequently while working on this plugin. I wouldn’t expect anyone to remember all of the parameters that exist for the thousands of hooks, filters, actions, and functions existing in WordPress. The handbook is a useful guide providing that information and more.
By way of example, let’s take a look at the get_the_title() reference. The code reference is broken down the same on each page as in Figure 1.
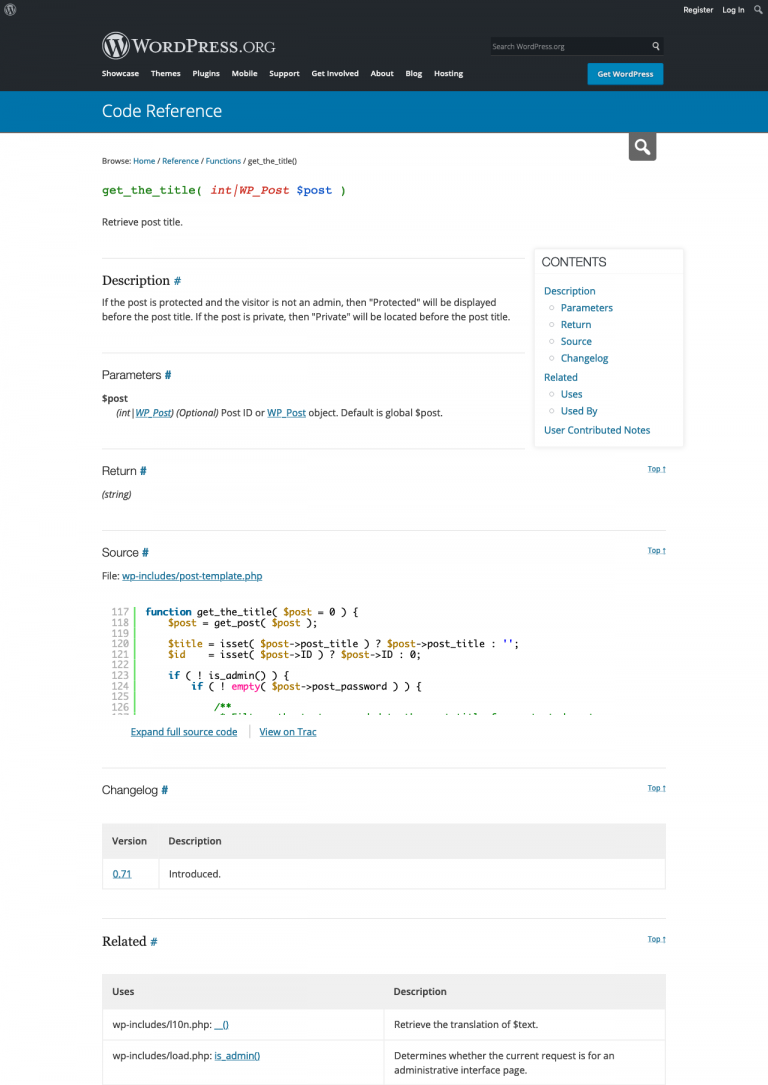
Figure 1.
First, there is a description of what the function does. In this case, it lets us know the title of a post is retrieved, and that there are certain conditions where the word “Protected” or “Private” appears before the title.
Next, the parameters for the function are listed. These are the pieces of information you can pass along with it to get the response you want. For get_the_title() there is only one parameter, $post, which is optional. If you don’t supply it, WordPress uses the global value for that variable. Most functions, in and out of WordPress, have parameters that would be passed to them to modify the function output.
After that, the handbook shows what kind of data the function returns, where the code lives in WordPress if you want to examine how it works, when it was modified, and what other functions use it. You can also see user-contributed notes, which often give examples of how to use the function and any gotchas that exist.
Set Up a Development Environment
Setting up a development environment is a large enough project that it’s outside of the scope of this tutorial. Multiple tools can help get you set up with a development environment for WordPress. I usually suggest those just getting started to try MAMP, Local by Flywheel, or ServerPress. There are plenty of ways to set up a WordPress site to develop with, and all that matters is that you can read and write files to the server, as well as make changes to the database.
Building the Plugin
Creating a Directory And Main File
Your plugin should exist in its directory on your site. This folder is where all of the PHP files which make up the plugin live, as well as any JavaScript, CSS stylesheets, images, and other assets for your plugin.
The root WordPress directory has three sub-folders: wp-admin, wp-content, and wp-includes. We’ll be focusing on wp-content, since that’s where user-managed files come into play, like themes and plugins. Within the wp-content directory there is a folder named plugins, which is where WordPress loads plugins from (Figure 2). Within that directory, we’ll be creating our folder.
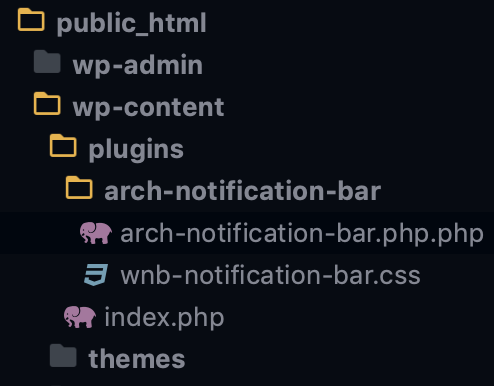
Figure 2
Naming Your Directory And Main Plugin File
Conventions dictate you only use lowercase alpha characters for the name of your directory, with hyphens to separate words for readability if you so choose. This convention comes from historical standards of case-sensitive filesystems. The main thing you need to be sure of is that your directory name does not contain spaces or any other special characters. arch-notification-bar is a valid directory name. php[arch] Notification Bar is not. Following these conventions helps avoid headaches later on.
Within that directory, you’ll be creating a PHP file that loads your plugin. This file can be index.php, but WordPress standards suggest using the same name as your directory. To follow that standard, we’ll create a file in our plugin directory called arch-notification-bar.php. This file is the first file that loads for our plugin, and in our case is where we’ll be putting the majority of our code. It could instead function as an autoloader for other PHP libraries, or a conditional loader of other files, but we’ll keep it simple for now.
Adding Header Comments to Describe Your Plugin
In our newly created PHP file, we’re going to add a plugin header. WordPress uses specific plugin header comments in PHP to denote parts of a plugin. Only one file in your plugin folder should have plugin header comments. The following is an example header for this plugin, which we’ll walk through line by line. If you don’t see your plugin in the WordPress dashboard, start by checking these header comments and ensure they are formatted correctly. See Listing 1 for an example.
Listing 1
<?php
/*
 * Plugin Name: php[arch] Notification Bar
 * Plugin URI: https://davidwolfpaw.com/plugins
 * Description: Display a notification for visitors on the frontend of your site!
 * Version: 1.0
 * Author: David Wolfpaw
 * Author URI: https://davidwolfpaw.com/
 * License: GPL v3 or later
 * License URI: https://www.gnu.org/licenses/gpl-3.0.html
 * Text Domain: arch-wnb
 * Domain Path: /languages
*/
The first header comment is Plugin Name, which is the text which displays on the admin dashboard of the site on the plugins page. This comment is where you’d put the more human-readable friendly name for your plugin, which in our case is php[arch] Notification Bar. It is the only required header comment for your plugin to have to function.
Following the plugin name are all optional header comments, though some of them are required if you want to upload your plugin to the wordpress.org plugin repository. These include a unique URL for your plugin (usually a sales or information page about that plugin you maintain), a description of the plugin, the version number, author name and URL, license and URL, text domain, and text domain path.
If your plugin has multiple authors, you can list multiple names, separated by a comma. Your Author name links to the Author URI you supply. In this case, I used my personal site, while the Plugin URI links to an internal page on that site devoted to plugins.
We’ll look at the Text Domain for your plugin a bit more when we start adding translatable text to it. It is a unique slug your plugin uses to denote text that can be translated to make your plugin usable in different languages. The Domain Path is a relative directory that contains any translation files for your plugin. In this case, we’re denoting /arch-notification-bar/languages as that directory.
All of the above information displays with the plugin name on the plugin admin page. It is not used to populate the plugin information in the wordpress.org plugin repository. That is instead done through a separate README.md markdown file.
Seeing Your Plugin In the Dashboard
Assuming your plugin folder and file exist in the wp-content/plugins directory on your site, you should be able to navigate to the “Installed Plugins” page and see your plugin. The following screenshot shows my plugin with the name, description, my name linked to my site, and the text “Visit plugin site” linked to the plugin URL that I added to my header comments. The plugin background is white, indicating the plugin is not active on the site (Figure 3).
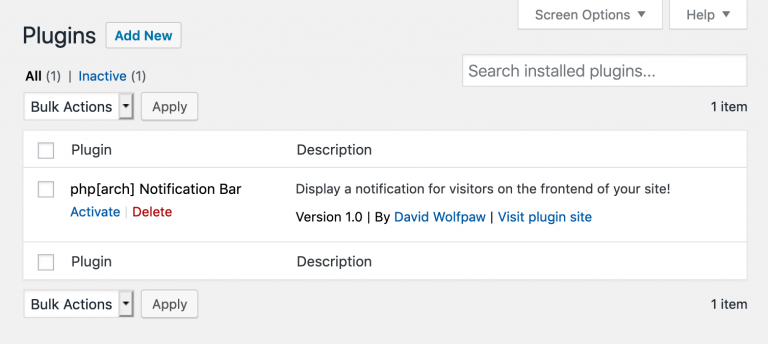
Figure 3
When the plugin is activated, the background turns blue to give a visual indication of its active status as you can see in Figure 4.
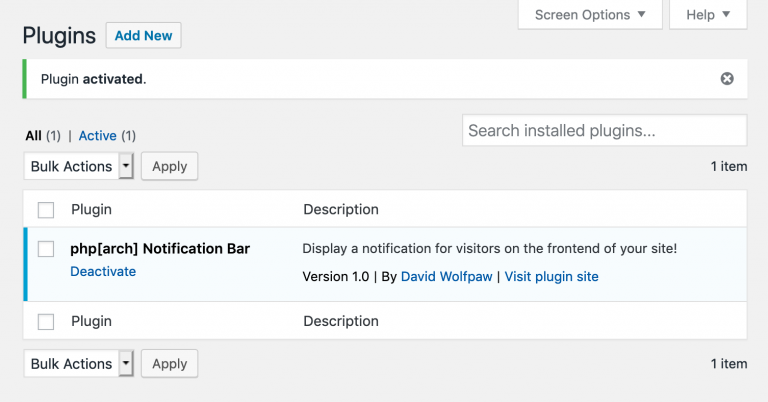
Figure 4
Now that we’ve activated our plugin, it’s ready to begin development. Any changes we make to our plugin are now visible on our site depending on where we’ve written code to appear. Up next, we’ll render a settings page for our plugin as well as a link under the “Settings” header in the dashboard toolbar which appears on the left when logged in.
Rendering the Backend of the Plugin
Often, you’ll have some options or settings for your plugin for the end-user. In our case, we’re going to have a text input that accepts HTML for the content of our notification bar. We’re also going to have two options that the site administrator can toggle for display: whether the notification bar shows at the top or bottom of the site or not at all, and whether the bar is sticky or not on scroll. These are going to be done on a settings page, using the Settings API. This plugin would also be suitable to use the Customizer API on, but we’ll focus on one method for now.
WordPress Hooks
Most of the code we add to our plugin is going to reference a WordPress hook. Hooks are points in the code which let you insert your code while WordPress is running. As an example, a hook called wp_head exists in the <head> tag when WordPress renders a page to allow you to include your meta tags, scripts, and links.
WordPress has hundreds of such hooks built-in for you to make use of at various points in the code. Many plugins and themes offer hooks of their own as well, so you can extend them for your needs. As examples, the Genesis theme has before and after content hooks to add custom HTML, and WooCommerce offers hooks to allow you to modify the content of the shopping cart.
The developer documentation has a comprehensive list of WordPress hooks.
WordPress Actions and Filters
Having a hook lets you inject your code. Actions and filters are how we use that placement. At their most basic, actions are bits of code that run when something else happens. This could be one of the examples above or something else like inserting inline scripts into the footer of a page.
Filters take the output of something that already happened and modify it. An example would be taking the title of a post and modifying it before it displays in the browser to capitalize all words. You aren’t changing the value of the title in the database, just how it looks to someone visiting the site.
Putting It Together for Our Plugin
Add a Menu Item for a Settings Page
We’re going to use the hook admin_menu to add our settings page link to our dashboard menu (Listing 2). We use the function add_action() to call our own function on that hook, which we’re naming wnb_settings_page(). The prefix of wnb_ we’re adding is a namespace that we’ve created to limit the potential of another function also called settings_page() that could be running on our site. Using object-oriented PHP is another way to avoid this issue, but is a bit out of the scope of this tutorial.
Listing 2
<?php
/**
 * Creates a link to the settings page under the WordPress
 * Settings in the dashboard
 */
add_action('admin_menu', 'wnb_settings_page');
function wnb_settings_page() {
   add_submenu_page(
      'options-general.php',
      __('Notifications Bar', 'arch-wnb'),
      __('Notifications Bar', 'arch-wnb'),
      'manage_options',
      'wnb_notifications',
      'wnb_render_settings_page'
   );
}
If you’d like an overview of object-oriented PHP in WordPress, Carl Alexander and Tom McFarlin both have useful free guides and articles to get you started.
You can see the callback that is added to add_action above matches the name of the function we wrote. In our case, this callable is a string referencing a function we’ve created, but it could also be an anonymous function or a call to a static method in a class.
That function, in turn, uses a built-in WordPress function, add_submenu_page(), which is fairly descriptive: it adds a new page as a submenu item below one of the main menu items in the dashboard.
The arguments that we’re using for that function are all documented in the WordPress Developer Handbook for add_submenu_page()
Render a Settings Page
We’ve created a link to our menu page under the Settings menu. If you click on that link though, you’ll see the page that loads has a PHP error because we haven’t defined the settings page itself. In the wnb_settings_page() function we gave the callback parameter of wnb_render_settings_page, which tells WordPress the function that we should look for to load the content of the settings page is wnb_render_settings_page().
Now we’re going to create that page with the code in Listing 3, which we can add to the same file with the menu function.
Listing 3
/**
 * Creates the settings page
 */
function wnb_render_settings_page() {
   ?>
    <!-- Create a header in the default WordPress 'wrap' container -->
    <div class="wrap">

        <h2><?php esc_html_e('Notification Bar Settings',
                             'arch-wnb'); ?></h2>

        <form method="post" action="options.php">

           <?php
           // Get plugin  settings to display in the form
           settings_fields('wnb_settings');
           do_settings_sections('wnb_settings');
           // Form submit button
           submit_button();
           ?>

        </form>

    </div><!-- /.wrap -->
   <?php
}
We created a new function, and in that function, we echoed the HTML we want to output. WordPress takes care of capturing that output and passing it on to other filters as needed. The div with the class of .wrap is one WordPress already uses in admin stylesheets, so we can use some built-in styles. Doing so allows us to avoid having to write code to style our page, as well as lets us keep the same user experience as the rest of the site. Similarly, the heading and form elements are styled with default WordPress styles, saving even more time and code.
The form element has a method of post, which means the information in the form is sent to the server, and the page updates when submitted. The action of options.php means we’ll be brought back to this same page on submit.
Within our form, we’re using three built-in WordPress functions. First, settings_fields( 'wnb_settings' ) lets the page know the fields we’re registering in the next steps are used on this page. Second, do_settings_sections( 'wnb_settings' ) will create the form inputs HTML. Finally, submit_button() creates the submit button for our form, and handles ensuring it takes the proper actions and is styled correctly.
Create Settings Sections And Fields
Now that we’ve created our settings page and built a form, we need to populate that form with fields. We’re going to use two field types on this form: a text input and several radio button groups. I’m going to use callbacks to generate those fields, so we can easily add or modify fields over time without having to update the HTML form inputs. You could write each field separately if preferred.
Take the code in Listing 4 and place it in the same file we’ve already been writing to. It doesn’t matter if this goes above or below the other pieces of code we’ve added because we’re using functional, as opposed to procedural PHP. We’re calling functions in this file when we want them to run, as opposed to processing the whole file step-by-step.
Listing 4
/**
 * Creates settings for the plugin
 */
add_action('admin_init', 'wnb_initialize_settings');
function wnb_initialize_settings() {
   add_settings_section(
      'general_section',
      __('General Settings', 'arch-wnb'),
      'general_settings_callback',
      'wnb_settings'
   );
   add_settings_field(
      'notification_text',
      __('Notification Text', 'arch-wnb'),
      'text_input_callback',
      'wnb_settings',
      'general_section',
      [
         'label_for' => 'notification_text',
         'option_group' => 'wnb_settings',
         'option_id' => 'notification_text',
      ]
   );
   add_settings_field(
      'display_location',
      __('Where will the notification bar display?', 'arch-wnb'),
      'radio_input_callback',
      'wnb_settings',
      'general_section',
      [
         'label_for' => 'display_location',
         'option_group' => 'wnb_settings',
         'option_id' => 'display_location',
         'option_description' => 'Display notification bar on bottom of the site',
         'radio_options' => [
            'display_none' => 'Do not display notification bar',
            'display_top' => 'Display notification bar on the top of the site',
            'display_bottom' => 'Display notification bar on the bottom of the site',
         ],
      ]
   );
   add_settings_field(
      'display_sticky',
      __('Will the notificaton bar be sticky?', 'arch-wnb'),
      'radio_input_callback',
      'wnb_settings',
      'general_section',
      [
         'label_for' => 'display_sticky',
         'option_group' => 'wnb_settings',
         'option_id' => 'display_sticky',
         'option_description' => 'Make display sticky or not',
         'radio_options' => [
            'display_sticky' => 'Make the notification bar sticky',
            'display_relative' => 'Do not make the notification bar sticky',
         ],
      ]
   );
   register_setting(
      'wnb_settings',
      'wnb_settings'
   );
}

/**
 * Displays the header of the general settings
 */
function general_settings_callback() {
   esc_html_e('Notification Settings', 'arch-wnb');
}
Quite a few things are going on above, so we’ll step through them one by one. First, we’re creating our function, wnb_initialize_settings() and placing it on the admin_init hook, so that this loads at the start of administrative pages on the backend dashboard of the site. In that function we’re using the following built-in WordPress functions as part of the Settings API: add_settings_section(), add_settings_field(), and register_setting().
All of our inputs need to go into a settings section. This section groups fields you want to be connected in some way, like if you have a settings page with multiple tabs of fields and want each tab to be able to function separately. Alternatively, maybe you have a social media plugin and want a section of settings for Twitter, a section for Mastodon, and a section for Instagram. This UI pattern is generally for organizational purposes, and in our case, we’re going to use one section for them all, which I’ve called general_section. Note that we’ve made a translatable string for the title of the settings section, provided a callback of general_settings_callback to give a header to this section (which is redundant in our case, but a required parameter of this function), and finally made a slug for a group of settings with wnb_settings.
Up next we’re using add_settings_field() three times to add our text input and two radio inputs. We first give a unique slug for each input, which is how we’ll later reference them on the frontend. We then add a translatable string which describes what it does to display while editing settings, set the callback for whatever type of input that we’re using (we’ll get to this in the next step), tell it that our input goes on the wnb_settings page in the general_section section, and pass an array of data about the specific input to our callback function that generates those inputs.
Finally, we’re registering our field with register_setting() so it can be written and read in the WordPress database. I use the singular field because though we have several settings, we’re writing them all to one row of the database as an array. Using this function allows us to make one database call when we want to get our options and use them on the frontend of the site.
Render Field Inputs
Above, we told the Settings API we’d be using the functions text_input_callback() and radio_input_callback() for our fields. We now need to create those inputs for our use. We have the flexibility to design them to fit our needs best, and what I’ve created in Listing 5 is just one way to do this.
Listing 5
<?php
/**
 * Text Input Callbacks
 */
function text_input_callback($text_input) {
   // Get arguments from setting
   $option_group = $text_input['option_group'];
   $option_id = $text_input['option_id'];
   $option_name = "{$option_group}[{$option_id}]";
   // Get existing option from database
   $options = get_option($option_group);
   $option_value = $options[$option_id] ?? '';
   // Render the output
   echo "<input type='text' size='50' id='{$option_id}'
                name='{$option_name}' value='{$option_value}' />";
}

/**
 * Radio Input Callbacks
 */
function radio_input_callback($radio_input) {
   // Get arguments from setting
   $option_group = $radio_input['option_group'];
   $option_id = $radio_input['option_id'];
   $radio_options = $radio_input['radio_options'];
   $option_name = "{$option_group}[{$option_id}]";
   // Get existing option from database
   $options = get_option($option_group);
   $option_value = $options[$option_id] ?? '';
   // Render the output
   $input = '';
   foreach ($radio_options as $radio_option_id => $radio_option_value) {
      $input .= "<input type='radio' id='{$radio_option_id}'
                        name='{$option_name}'
                        value='{$radio_option_id}' " .
         checked($radio_option_id, $option_value, false) . ' />';
      $input .= "<label for='{$radio_option_id}'>'"
             . "{$radio_option_value}</label><br />";
   }
   echo $input;
}
Each of those functions generates an HTML input with the details of our settings fields so they save properly to the database, as well as pull the existing database values for display. Figure 5 shows the settings page for our plugin.
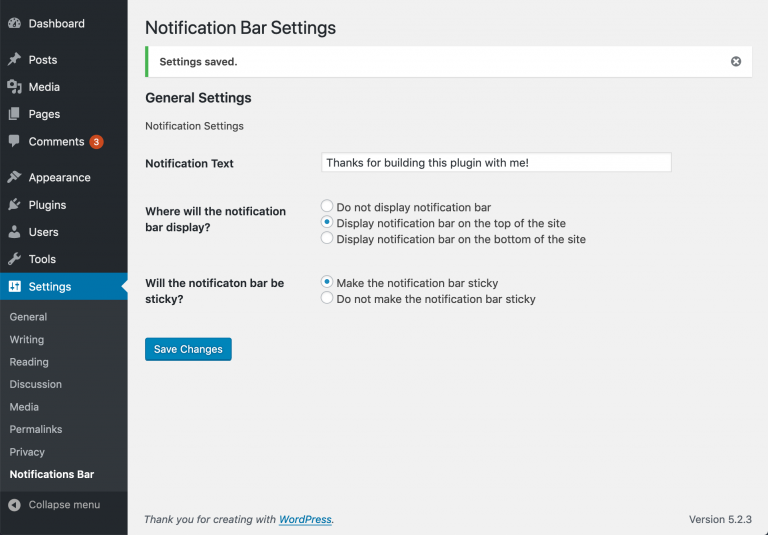
Figure 5
Rendering the Frontend of the Plugin
We’ve done a lot of work on the backend to get settings created for our plugin. Now it’s time to create and style the frontend of our plugin, so visitors to our site can see the hard work that went into what we created. We’re going to first render the data with some HTML on the frontend of the site, and then we’re going to enqueue a stylesheet so we can apply some CSS to those elements.
Render the Display
First, we’re using the hook wp_footer to insert some HTML for our notification bar near the closing </body> tag. Although we’re adding it to the bottom of the page, we can use CSS to style it to appear at the top of the page if that’s what’s set.
Using the function get_option, we’re checking that there are options already saved for our plugin before displaying any HTML. If we haven’t given a notification message, then there won’t be anything worth displaying yet. We then assign the output of that function to a variable, so that we can get values from it.
Since the setting that we saved to the options table in our database is an associative array, we can call individual values as needed. We have a div with a class that we can style, but then we can display additional classes based on the settings we have for the location that the notification bar should display, as well as if it is sticky or not. Within that div, we have another div containing the value of the notification text that we set. See Listing 6.
Listing 6
<?php
/**
 * Displays the notification bar on the frontend of the site
 */
add_action('wp_footer', 'wnb_display_notification_bar');
function wnb_display_notification_bar() {
   if (null !== get_option('wnb_settings')) {
      $options = get_option('wnb_settings');
      ?>
       <div class="wnb-notification-bar <?php echo $options['display_location']; ?>
            <?php echo $options['display_sticky']; ?>">
           <div class="wnb-notification-text">
              <?php echo $options['notification_text']; ?>
           </div>
       </div>
      <?php
   }
}
All of this together equals a working plugin that displays text on the frontend of our site! Now, all that’s left to do is enqueue a stylesheet which includes some CSS to make our notification bar look nice.
Enqueue a Stylesheet
WordPress has a hook for adding new scripts and stylesheets called wp_enqueue_scripts. We’re going to use that to hook in the function wp_enqueue_style() and add our stylesheet located in our plugin folder (Listing 7). We have to create that new file, which we’ve called wnb-notification-bar.css then use the function plugin_dir_url( __FILE__ ) to tell WordPress to find it in the same folder as the current PHP file. We are also setting an empty array of dependencies, meaning it doesn’t have to wait for other files to load first, as well as setting a version number so we can use it for updating and cache-busting in the future as needed.
Listing 7
/**
 * Loads plugin scripts and styles
 */
add_action('wp_enqueue_scripts', 'wnb_scripts');
function wnb_scripts() {
   wp_enqueue_style(
      'wnb-notification-bar-css',
      plugin_dir_url(__FILE__) . 'wnb-notification-bar.css',
      [],
      '1.0.0'
   );
}
In the file that we just created, wnb-notifications.css shown in Listing 8, we’re adding some CSS to style the notification bar. We also have the classes created in the settings to display it at the top or bottom of the page, as well as be sticky or not. There are some styles at the bottom to handle the WordPress admin bar while logged in as well.
Listing 8
.wnb-notification-bar {
    z-index: 1001;
    position: relative;
    width: 100%;
    background: #000;
    color: #FFFFFF;
    text-align: center;
}

.wnb-notification-bar.display_top {
    top: 0;
    position: absolute;
}

.wnb-notification-bar.display_bottom {
    bottom: 0;
    position: relative;
}

.wnb-notification-bar.display_top.display_sticky {
    position: fixed;
}

.wnb-notification-bar.display_bottom.display_sticky {
    bottom: 0;
    position: sticky;
}

.wnb-notification-text {
    padding: 10px
}

.admin-bar .wnb-notification-bar.display_top {
    top: 46px;
}

@media screen and (min-width: 783px) {

    .admin-bar .wnb-notification-bar.display_top {
        top: 32px;
    }

}
Figure 6 shows the notification bar on a WordPress page along with Firefox’s inspector view of the CSS.

Figure 6
Wrapping Up
We’ve covered a fair amount: using the Settings API to create our settings, enqueuing stylesheets, and inserting HTML and PHP using WordPress hooks. This article is just the start of what we can do with this plugin. We can ensure that options are set or place defaults as one addition, as well as sanitize all of the option callbacks to make sure people don’t insert broken or malicious code into our text box. There is an excellent guide on the WordPress Codex for sanitization and validation. We could also move the settings to the Customizer API to view our changes while editing on the frontend.
There are countless ways you can begin to modify this plugin to fit your needs, or start from scratch and build something entirely new. My hope is the introduction to concepts in plugin development shown here provides a solid start to building your plugins. Now that you have some practice put it to use on your next WordPress project!
Related Reading
- finally{}: Semver, PHP and WordPress by Eli White, July 2019.
- WordPress and the IndieWeb—Why You Should Own Your Voice by David Wolfpaw, March 2019.
- Custom Post Types in WordPress by Andrea Roenning, December 2018.
Biography
David Wolfpaw is a professional web developer focused on WordPress theme and plugin development. He emphasizes helping small businesses, providing ongoing support, and educating users through his service FixUpFox. He helps organize both WordPress Orlando and WordCamp Orlando. @davidwolfpaw




Leave a comment
Use the form below to leave a comment: