Automating Our Tests With GitHub Actions
As developers, we need to automate as much as possible. This saves us time and money as well as keeps us from skipping steps. I used to have a project where I would run my tests manually before I push them into production. It started out taking 1 to 5 minutes and that was fine because I could just start the test running and get a warm cup of coffee. But eventually, it grew and grew until it was 30 minutes and that was just too long for me to sit around and wait for my tests to pass. I started to skip running the tests which lead to a test suite I couldn’t trust.
The solution is to run automated tests on a system that is specifically set up to run automated tests so we don’t have to wait. We want to integrate that solution as closely as possible to our source code so that every time we make a change our tests run immediately and automatically. Thankfully, GitHub provides Actions to do this.
In this article, we’ll describe what GitHub Actions are, how to use them, and work through an example of setting them up in our example project.
What Are GitHub Actions
At a high level, GitHub actions allow developers to automate tasks on their source code. This includes running tests and building assets as well as running tools that will automatically refactor or publish assets. GitHub allows us to require these actions to pass so we can’t merge in changes before they pass.
The powerful part about GitHub actions is that they run in a container so we can install whatever we need to to get our code tested. It also makes our GitHub actions infinitely scalable. We can have five developers running five actions at the same time and it’s not going to slow any of them down.
As PHP developers, it’s almost dead simple for us to get a GitHub Action set up to run any number of tools on our code to make sure it’s functioning correctly. GitHub Actions are configured through YAML files inside the “.github” directory of a repository so we can very easily integrate it with our source code and test changes on a new branch.
I’ve used third-party tools to do automated testing before and they just weren’t as smooth as GitHub Actions. The integration of GitHub Actions into our GitHub workflow is so smooth. When I used Jenkins, it always had delays running tests, it would take a long time for the test to run, and it was expensive to maintain.
Adding Automated Tests to Our Value Objects Project
Over the last several videos, we’ve been working on creating a Value Objects library. Let’s add GitHub Actions to this project.
To start, we’re going to click the “Actions” tab on our project. Without an existing actions file, GitHub is going to suggest a few actions based on the fact that this is a PHP project. We could write the YAML file ourselves, but it’s so much easier just to press that configure button and have the most current set of standards.
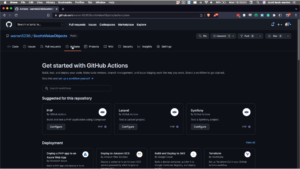
After I pressed the configure button for the “PHP” Action, it’s going to bring us to a GitHub editor that allows us to see the file that it’s about to create and allows us to edit it. It automatically puts it in the “.github/workflows/” directory, but we can name it whatever we want. I’m going to name it “php.yml”.
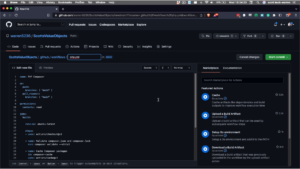
This is the content of the final file in case you want to copy and paste it quickly.
name: PHP Composer

on:
push:
branches: [ "main" ]
pull_request:
branches: [ "main" ]

permissions:
contents: read

jobs:
build:

runs-on: ubuntu-latest

steps:
- uses: actions/checkout@v3

- name: Validate composer.json and composer.lock
run: composer validate --strict

- name: Cache Composer packages
id: composer-cache
uses: actions/cache@v3
with:
path: vendor
key: ${{ runner.os }}-php-${{ hashFiles('**/composer.lock') }}
restore-keys: |
${{ runner.os }}-php-
- name: Install dependencies
run: composer install --prefer-dist --no-progress

- name: Run Tests
run: ./vendor/bin/phpunit
The first line is just setting how the action will be displayed to us when it runs.
Lines three through seven are configuring when the action should run.
on:

push:

branches: [ "main" ]

pull_request:

branches: [ "main" ]
This configures the action to run every time we push to the “main” branch and anytime there’s a pull request that targets the “main” branch. If we have a project or release branches, they will not run automatically unless we configure that inside of this section.
The next section is just telling GitHub that it needs read access to our repository and it’s not going to be writing any data to it.
permissions:

contents: read
The next section is the `jobs` and this is where the work of the Action occurs. Here we’re telling GitHub exactly what it is that it’s going to do to run our action.
The first thing that we’re doing is we’re telling it we need to run on the latest version of Ubuntu.
runs-on: ubuntu-latest
This brings us to the actual steps of the action.
First, we’re going to use “actions/checkout” to checkout our repository into our container. This is maintained by GitHub and is usually the first thing we need to do.
- uses: actions/checkout@v3
Now we’ll validate our “composer.json” and “composer.lock” to make sure they’re valid before we do anything else.
- name: Validate composer.json and composer.lock

run: composer validate --strict
The next step uses the “actions/cache” action to set up a cache of our “vendor” directory so the next time our action runs with the same “composer.lock” it won’t have to download all the files again.
- name: Cache Composer packages

id: composer-cache

uses: actions/cache@v3

with:

path: vendor

key: ${{ runner.os }}-php-${{ hashFiles('**/composer.lock') }}

restore-keys: |

${{ runner.os }}-php-
We’re finally ready to install our composer dependencies.
- name: Install dependencies

run: composer install --prefer-dist --no-progress
The PHP action we picked to use as our template uses the composer configuration to run our tests but I’m going to just have it run directly.
- name: Run Tests

run: ./vendor/bin/phpunit
Finally, I’m going to commit this file to our repository using the GitHub interface.
Now we can go to the “Actions” tab of the repository to see our results.
Actions will indicate the status of our action with either a yellow circle indicating it’s still running, a green circle to indicate the actions ran successfully, or a red X to indicate they’ve failed.
Multiple PHP Versions
Now, as a library maintainer, one of the things that we have to always be aware of is making sure that we’re supporting multiple versions of PHP. As you may have noticed, we only ran our action on one version of PHP and I’m not even really sure what it is. My guess is it’s 8.1 because that’s what it’s currently supported in Ubuntu. But what if we wanted to run it on multiple versions to make sure that our library works for all the supported versions?
To do this we’re going to modify our action. The first thing that we’re going to do is define a matrix of different PHP versions we’re going to support.
phpunit:

runs-on: ubuntu-latest

strategy:

fail-fast: false

matrix:

php-versions: ['8.0', '8.1']
Now we also need to add another step that sets up PHP inside of our container with the version of PHP we’ve specified.
- name: Setup PHP

uses: shivammathur/setup-php@v2

with:

php-version: ${{ matrix.php-versions }}

extensions: mbstring, dom, fileinfo, mysql

coverage: xdebug
Now to demo how the GitHub Actions integrate into the pull request feature inside of GitHub, I’m going to create a pull request for this. To do this I created a branch, committed my changes, pushed them to GitHub, and created a pull request.
Because we specify that we were going to run the actions when we create a pull request against the “main” branch, GitHub automatically starts a run of our Action and we can see the results inside of the pull request. As you can see, our 8.0 is failing, but 8.1 is passing.
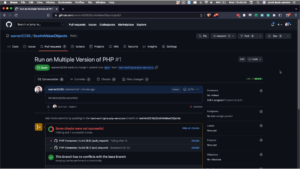
To see why the 8.0 branch failed, we can click on these details and it will bring us over to the actual results for our action. We have multiple packages that we have locked in at PHP 8.1 that don’t work in 8.0. We have to go back and fix that before committing to the branch.
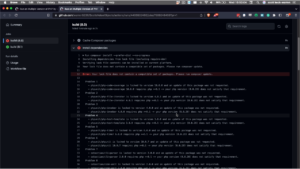
But because we did it on a branch and GitHub ran the actions for us, we know about the problem before we push it to main and broke it for somebody.
What You Need To Know
- Github actions give developers the ability to automate their workflow.
- It can be used for tests, building assets, and running tools to refactor our code.
- There’s a small amount of setup to be involved, but it’s very easy to use afterward.




Leave a comment
Use the form below to leave a comment: